The trend of being unique and doing unconventional things never takes a back seat and this applies to home designs as well. Many homeowners are moving away from traditional designs and opting for more distinct styles. When it comes to flooring, in particular, crazy paving is winning hearts.
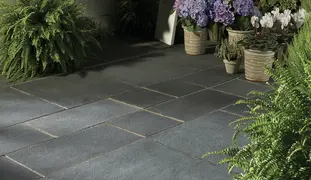
For those who don't know, Crazy Paving, also known as flagstone or random paving, is a method of laying natural stones in an irregular pattern. It is commonly found in outdoor spaces, such as gardens, patios and pathways.
Knowing how to lay Crazy Paving involves using different types and sizes of stones to create an appealing unique pattern.
If you want to do something unusual with natural stone, Crazy Paving is an excellent option. This pavement style may be done in any size or form, allowing for unlimited creativity. This one-of-a-kind pavement is perfect for adding interest and texture.
When properly laid, Crazy Paving may survive for years with no further maintenance.
Step-by-Step Guide on How to Lay Crazy Paving
Step 1 Creating a Guideline Design Layout:
It's critical to draw design layout first; this may seem unnecessary if you already know where you want your Crazy Paving to go. But this simple step will ensure that you don't go outside your planned area and that all the stones are aligned correctly without going over budget. Because of the irregular stone forms, this stage is critical for Crazy Paving. The aim is to fit them together accurately, almost like a jigsaw. The last thing you want to do is waste your time and money on a pavement that will not look good when completed.
Step 2 Designating the Area
All you need to make your guidelines are a few wooden/metal spikes and a bit of string but how long should the string be?
The length of the series and the number of spikes needed will be determined by the size and form of your design. At least one spike for each corner is suggested. Take your spikes and drive one into the ground in each corner of the proposed area, then tie a thread to each one to form a barrier around your prospective pavement. Sorted? Now it's time to start excavating.
Step 3 Making Space for Your Paving
You'll want to lay your crazy pavement at ground level, but you'll need to dig a little deeper (typically approximately 15cm) to create room for the gravel and cement that will hold your Crazy Paving in place for years. It is the most challenging phase, yet skipping it might result in uneven paving, therefore, don't skip it.
Step 4 Securing the Area
With your standards in place, you must now secure them to produce solid, long-lasting pavement. Place some wooden pegs at 1m intervals along the edge of your ‘barrier’ space. (Again, this may differ depending on your work area). Then, using a drill, fasten the lumber to the pegs.
Step 5 Placing the Hardcore
By now, you're visualising your ideal pavement for next summer, but don't get too enthusiastic! Once you have completed all the necessary preparations for your Crazy pavement, you can proceed to apply gravel to the prepared surface.
The stone will rise to a height of around 10cm and may then be scraped to produce an equal surface. When you're satisfied with your gravel coverage, grab a sledgehammer and crush the gravel until you have a dense and firm foundation for your mortar.
Step 6 Placing Your Crazy Paving
You should test how your paving will look before putting in any mortar. You may accomplish this by laying the stones on the gravel in the proper locations. This is known as a dry lay, and it eliminates the chance of running out of stones or laying them in an unsuitable manner for your allocated space; it also ensures that the oddly shaped stones will match your layout plan.
When you're satisfied with your placement and everything fits together correctly, remove the stones, lay down your mortar and replace the stones firmly. You will next need to wait for the mortar to set, which should be indicated on the mortar bag. Remember that you'll want to save some of this mortar for the final touches.
Step 7 Finishing Touches
Is your mortar ready? Is it starting to resemble your vision? All that remains is to fill in the gaps with some excess mortar and your paving will be finished and ready for the summer. You may now sit back and appreciate your work; you might even consider organising a BBQ to show off your beautiful garden.
Benefits of Crazy Paving
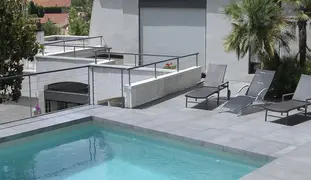
The appearance and use of a Crazy Paving design in your garden or patio area are two of the most notable advantages. The unforced, natural aspect of Crazy Pavers, made by combining stones of various sizes, can offer an outdoor area's true individuality.
Furthermore, because of its setting, this form of paving is long-lasting and capable of withstanding various weather conditions for an extended time. As previously said, intentionally leaving small spaces between each stone allows the garden owner to be creative and add something extra to the cracks, providing an even more stunning finish.
Final Takeaway
Crazy Paving one alternative that is gaining popularity. Crazy pavement is precisely what it sounds like, a style of paving that combines unevenly shaped stones to produce an eye-catching appearance.
We have a wide selection of unusual paving stones at Stone Depot. For further information on any of the above, or if we can assist you with a specific question, please get in touch with a member of our team immediately.
Also, see our instructions on how to avoid common mistakes while laying Crazy Paves.
FAQs
- What is Crazy Paving?
- What are the benefits of Crazy Paving?
- Can I lay Crazy Paving myself?
- How long does Crazy Paving last?
- How to take care of crazy paving?
- Is crazy paving an eco-friendly option?
Crazy paving is a style of laying natural stones in a random and irregular pattern. The stones come in different shapes and sizes, which makes the paving look unique.
Crazy Paving gives your outdoor space a distinct look. It is highly durable, weather-resistant, non-slip and can handle heavy foot traffic.
Yes, you can lay Crazy Paving yourself by following a step-by-step guide. It involves planning your design, preparing the ground, placing the stones, and securing them with mortar. You also need to make sure the stones fit together properly before applying the mortar. But it would be advisable to take expert consultation.
If laid properly, Crazy Paving can last for 20 to 25 years.
They are very easy to maintain. Simply sweep the dirt regularly and mop the floor with a pH-neutral cleanser occasionally. Do not use any harsh chemicals and acidic solutions.
Yes. Crazy Paving promotes sustainable construction. These pavers are the stones from the quarry waste that would otherwise be wasted due to their inability to be cut into pre-defined dimensions.
Here are a few more blogs that will help you to learn more about Crazy Pavers:
- Super Easy Ways of Maintaining Crazy Pavers
- Outstanding Crazy Paving Ideas
- Ultimate Guide for Crazy Pave
*Disclaimer: All information and advice given above in the blog are to the best of our knowledge. Please reconfirm at your end before execution.
*Disclaimer: All information and advice given above in the blog are to the best of our knowledge. Please reconfirm at your end before execution.