Finding something that reflects their uniqueness in their house can be a challenging task, especially for rebels who don't like to follow worldly trends. There are so many options, yet nothing to make your home stand out from the rest of the neighbourhood.
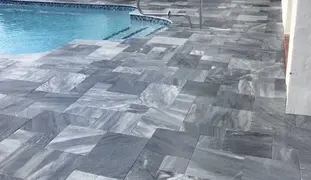
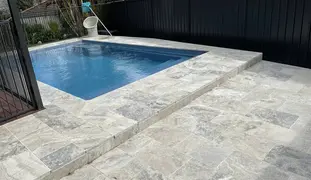
Well, your search ends here! Let us introduce you to some random and irregular patterns known as Crazy Paves. They got their name due to their unique look. They were first used in Rome by combining broken stone pieces and waste cut-offs. The best part is they are made of natural stones and are durable, weather-resistant and low maintenance. They are trending everywhere and believe it or not, they will soon take over the outdoor space.
The haphazard layout lends a bold character to every space they are installed in, including walkways, patios and more. However, people tend to make a lot of mistakes while laying them. Here is a step-by-step guide to help you in the process.
Measuring and Budgeting
Measuring the area is the first step for calculating the number of stones you would need. Take an estimate of the entire perimeter of the area and then figure out the space where you want crazy paving, in square meters.
Another step you should do is plan your budget. Make sure to add stone sealant to your budget to avoid any funding issue in the future. Sealants are necessary to protect the stones when exposed to high traffic, weather fluctuations, or moisture.
Planning the area
The second step is to create the physical layout of the area. Get spikes and strings to form a border around the proposed crazy paving area. Plant the spikes into the ground and connect the strings around them, from one corner to another. This will give you a clear vision of where to place your paving stones. Another benefit is Crazy paves won't go out of the area, as they have the tendency to go out of the assigned area.
Preparing the base and laying the stones
Wet Mortar Bedding method:
- If you are laying crazy pavers with thickness less than or 20 mm onto a concrete slab, use a flexible glue to stick them to the slab.
- Dampen the concrete, apply the adhesive, place the mortar mix. Also, apply the bonding adhesive to the back of the stone for better sealing.
- Place the stone in place and gently tap with a rubber mallet. This tool will avoid any marks on the stones. Tapping ensures there are no air bubbles trapped beneath the stone as they cause the adhesive to weaken with time.
- Always start by laying the bigger stones first followed by smaller stones that are used as fillers.
- Open joints of 8-10mm spacing should be allowed. Fill the empty space around the stones and remove any excess mortar.
- Remove excess material from the surface with a clean sponge and water. This will avoid staining the stones and clean any mess.
Adhesive Bedding method:
- In case you are laying the stones on the ground, prepare a compact road base and sand cement screed.
- The screed should be flattened and dry, followed by the removal of dirt, dust, or oil.
- Prepare a uniform layer of adhesive, around 8-10mm thick and spread it on the back of the stone. Always clean the stone before applying the adhesive.
- Please make certain that the adhesive doesn't dry up while being exposed to the air for too long. Therefore, apply adhesive to the stone one by one.
- Lay the stones and tap with a rubber mallet. Remember to start with bigger stones and then fill the gaps with smaller stones.
- Allow consistent open joints of around 7-10mm.
Grouting
The process of grouting would remain the same in both methods.
- With a sponge, dampen the grout joints and stones.
- Place the grouts into the joints, taking care to avoid vacuums. Thrust the grout to the full depth of the stones.
- Remove all the excess grout with the help of the trowel.
- Once the grout is set, use a wet sponge to clean the paving stones. It will remove the extra grout, dirt, rubble, or dust. You can use a pH-neutral cleaner and a nylon pad to get rid of stubborn elements like oil or debris.
- Please note you should never use acidic cleaners, as they can damage the stone and grout beyond repair.
Sealing
The last step in the crazy paving installation is sealing. As mentioned earlier, sealing protects the stones from all the harsh elements and keep them durable for years to come. It is advisable to use a good quality sealer that helps in locking the color and shine of the stones.
In conclusion
Crazy Paves are making a rebellion in the world of outdoor landscaping. And if you are a rebel within, they are your perfect outdoor landscaping partner. Adding crazy paving will make your space look unique, visually appealing and welcoming.
However, make sure to follow the steps from measuring, budgeting to planning the area. Once you are done with these ensure to do proper installation and sealing using stone tools only. With proper planning and tools, there would be fewer hurdles. Follow these easy hacks and simplify the process of crazy paving.
Our Crazy pavers are available in Bluestone, Limestone, Sandstone among others. If you have suggestions or experiences to share, write to us at [email protected] or call us on 1300 830 274.
FAQ's
- Why is sealing important for Crazy Pavers?
- Can I use Crazy Pavers on sloped or uneven surfaces?
- What tools and materials are necessary for Crazy Paving installation?
- Can I use Crazy Paver for Driveway?
- Can I use Crazy Pavers for Garden Edging?
Sealing is important for Crazy Pavers because it protects them from harsh weather conditions, unwanted moisture, chipping and wear from heavy footfall. It also helps lock in the colour and shine of the stones, keeping them as good as new for years.
Yes, you can lay crazy pavers on sloped or uneven surfaces. However, it is important to prepare a stable base first. If you have even the slightest doubt, connect with the professionals. They will use the right methods for laying the stones ensuring proper sealing, installation and grouting have been done.
You will need stone sealants, spikes, strings, a trowel, a rubber mallet, grout, cement, sand, adhesive, measuring tape, ballast and a shovel.
No, you cannot use crazy paver for driveway. It is because crazy pavers are thin compared to a paver.
Yes, you can use crazy paving for garden edging. It will add visual appeal to your garden and look highlighted among your green plants and flowers, complementing them.
*Disclaimer: All information and advice given above in the blog are to the best of our knowledge. Please reconfirm at your end before execution.
*Disclaimer: All information and advice given above in the blog are to the best of our knowledge. Please reconfirm at your end before execution.