It is Sunday morning.
The coffee is brewing. The morning sunlight is slowly spreading across your natural stone patio. Everything looks exactly as it should be.
Until a dark patch near the corner catches your eye.
This is something many homeowners experience with natural stone. Moisture, stains and daily wear can subtly alter the appearance of natural stones over time. These changes are often so gradual that they are only noticed once the surface begins to look less vibrant.
The good news?
You can easily stop that damage before it starts. A proper sealing can protect the stone from everyday’s wear and tear. In this guide, you will explore why stone sealing matters to keep your natural stone surfaces look their best for years to come.
What Is Stone Sealing and Why Does It Matter?
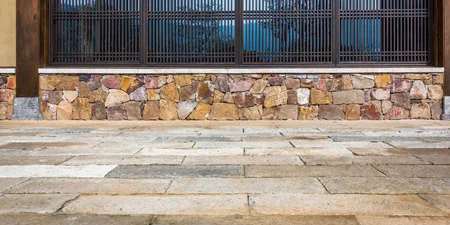
Natural stone is a hard material with porosity. It absorbs liquid and spills over time. Without some protection, everyday things like water, dirt, oil, and even sunlight will quickly ruin the surface. Things like kitchen grease or tracked-in mud can sink deep into the stone, leaving you with permanent stains, while UV rays will bleach out its rich, vibrant colors. Putting on a high-quality stone sealer is the best way to protect your investment. It locks out liquids and grime before they can soak in.
Vision & Action Plan
- Protection from stains: Stains remain on the surface allowing quick removal.
- Easier cleaning: The sealed surface repels dust enabling fast weekly maintenance.
- Increased durability: Prevention of water penetration ensures years of service.
- Improved aesthetics: Correctly selected product will keep the flooring shiny and as new.
Selecting the Right Sealer for Your Surface
Penetrating Sealers
Penetrating sealers penetrate deep into the pores of the material. It protects against moisture infiltration without affecting its texture due to application in those spaces. This sealer is preferred by homeowners since it preserves unprocessed stones without changing their original color.
Enhancing Sealers
Enhancing sealers come in handy when you want the deep coloring effect of your stone. Not only does it protect the surface but also offers a visible color enhancement feature. They make perfect candidates for use in accent walls and interior décor elements, as they display nature’s unique veins and designs.
How to Seal Tiles and Natural Stone Correctly
Step 1: Clean the Surface Thoroughly
Before you start tile sealing, the stone must be clean and free of dust. Sweep and mop the area with a mild cleaner so no dirt gets trapped under the new coat.
Step 2: Allow the Stone to Dry
Water can ruin a fresh seal. It is best to let the stone dry for at least a full day after cleaning. Trapped dampness can make the sealer look weird.
Step 3: Apply the Sealer Evenly
When learning how to apply tile sealer, slow and steady moves work best. Use a soft paint roller or a clean cloth to spread the liquid across the tiles in thin, even layer.
Step 4: Remove Excess Product
Stone can only absorb a limited amount of sealer at one time. After 10 to 15 minutes, use a dry microfibre cloth to wipe away any excess product remaining on the surface.
Step 5: Allow Proper Drying Time
Patience is just as important as the application itself. Once the sealer has been applied, let the surface sit without anyone walking on it or getting it wet for the exact time printed on the bottle.
Why Sealing Stone Tiles Before Grouting Can Be Beneficial
Putting a sealer coat on before you grout your tiles saves tons of time. This quick barrier keeps raw stone edges from absorbing dark grout pigments and staining permanently. It also stops wet grout from sticking to the tile faces, so cleanup is much faster and you avoid surface discolouration.
Selecting the Right Sealer for Different Areas of the Home
Kitchen Floors and Splashbacks
Kitchen floors see a lot of footsteps and dropped food. For these busy spots, it is smart to pick a product that stops grease and cooking oils from ruining your stone. A good stone tile sealer keeps your walls looking bright, even when hot pasta sauce splashes up.
Bathrooms and Showers
Bathrooms are meant to be wet and steamy most of the time. Using a proper shower tile sealer stops water from sinking deep into the walls. This simple step keeps the space feeling fresh and makes your weekly bathroom wash much easier.
Outdoor Entertaining Areas
Outdoor zones must deal with changing weather all year long. Picking a tough outdoor tile sealer ensures your patio stays safe from heavy rain and hot sun. Look for a tile sealant with high UV safety so it does not turn yellow or break down under the bright sun.
Common Stone Sealing Mistakes to Avoid
Staying away from a few simple errors will help your stone sealing project turn out great:
- Sealing a damp surface: Putting stone sealer over wet rock can leave patchy white spots that are hard to fix.
- Applying excessive product: Leaving too much liquid on top of the tiles creates a sticky layer that catches dust and footprints.
- Using the wrong sealer: Picking a product that does not match your stone type. The shield will not stick properly.
- Ignoring dry times: Walking on the floor too soon can break the guard before it dries.
- Forgetting ongoing maintenance: Every sealer thins out over time, so skipping regular checks leave your stone open to serious damage.
How to Know When It's Time to Reseal Your Stone
The Water Drop Test
You can check your stone anytime with a quick test. Spill a few drops of water on the tile and let it sit for ten minutes. If the water beads up like a ball, your sealer is good, but if it sinks in and leaves a dark wet spot, you need a fresh coat.
Signs of Wear and Reduced Protection
Here are some signs that indicate that your natural stone sealer is wearing off:
- Darkening after moisture comes into contact: Your bathroom or patio tiles are getting dark because water is seeping through.
- Staining becomes more evident: Drinks left on natural stone surfaces will immediately begin staining.
- Difficult cleaning: When dirt sticks to the tile and requires hard scrubbing, the old seal has worn thin.
Caring for Sealed Stone Surfaces
Keeping your sealed stone looking great just takes regular cleaning with pH-neutral products. A quick daily sweep and a regular mop with warm water and a gentle cleaner will do the magic. This keeps the surface clean without stripping away the protective sealer you just applied.
Avoid harsh household chemicals like bleach or vinegar. These acidic liquids ruin the sealant and expose raw stone to stains. Also, high foot traffic naturally wears down even the best sealers over time. When basic cleaning stops working, professional resealing restores deep, long-lasting protection.
Conclusion
Choosing the right natural stone sealer is a wonderful way to keep your home looking beautiful. A good coat protects your floors while making daily clean-up quick and simple. Taking the right steps and being gentle during cleanup ensures your stone lasts a lifetime. Putting a proactive protection plan in place now is a simple way to enjoy your stone features without dealing with massive repair bills.
*Disclaimer: All information and advice given above in the blog are to the best of our knowledge. Please reconfirm at your end before execution.